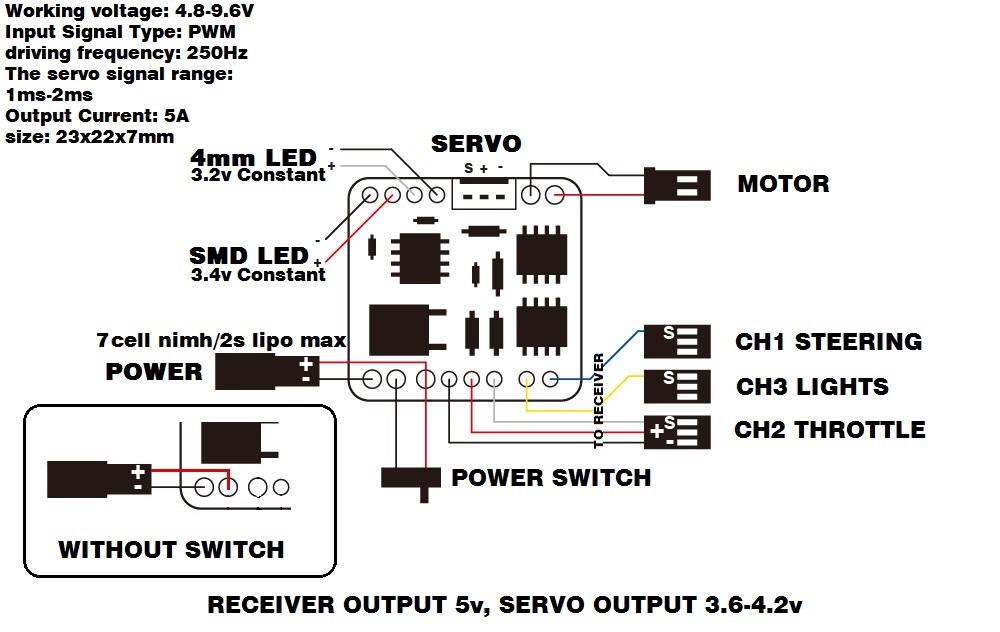
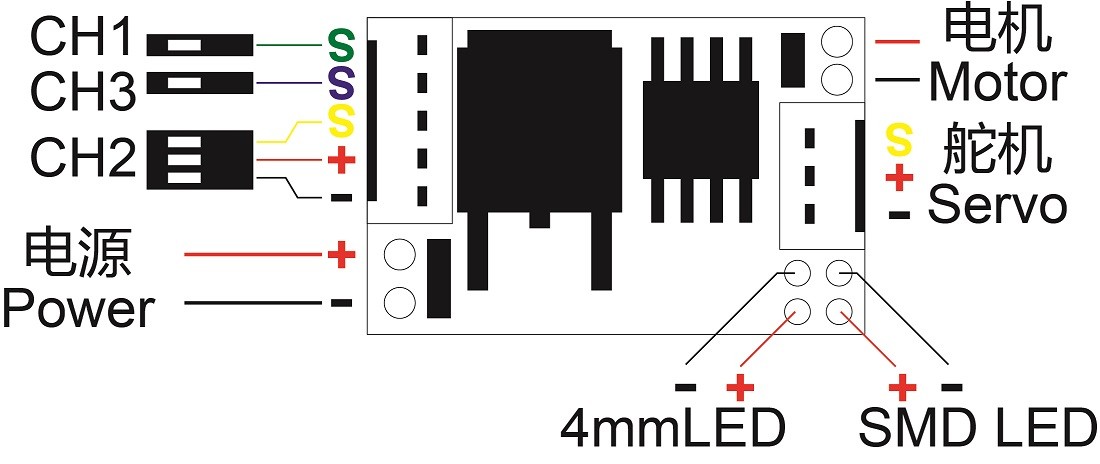
In addition to the usual motor output, the TS0001 Orlandoo ESC has a low voltage socket for the 1.7g or 2.2g Orlandoo steering servos. It also has a basic onboard light controller with output pads for you to wire in the included LEDs and operate them from your radio handset.
Basic Connections:
The 3-wire servo plug goes to ch2 on your receiver as with any other ESC. The male JST RCY (red) plug connects to your motor. The female JST RCY (red) plug connects to your battery.
Adding an On/Off Switch (not included, soldering required)
If you want to wire in an on/off switch for your Orlandoo, there is an additional output pad on the board next to the battery input leads.
Connecting an Orlandoo Low-Voltage Servo
If you are using a low voltage socket for the 1.7g or 2.2g Orlandoo steering servos , they should be plugged in to the white socket on the TS0001 ESC, and then connect the blue single-wire servo plug to ch1 on your receiver to control the steering servo. The ESC delivers the required 3.7v-4.2v voltage for the servo (rather than 6v from your receiver) and passes the signal along from the receiver via the blue wire to the servo.
NOTE: If you are using the TS0001 ESC with a normal (6v) steering servo, you can delete the blue wire and plug your servo directly into ch1 of your receiver as with any other RC.
Connecting LEDs (soldering required)
You can power LEDs for your truck from dedicated output pads on the TS0001 ESC. There are two pairs of pads, one provides 3.3v, suitable for white LEDs, the other provides 2.2v, suitable for red LEDs. The ESC includes 4mm white LEDs and surface-mount (SMD) red LEDs, which will need wiring up to the ESC board.
If you have a 2ch radio, the LEDs will be ‘always on’ as long as the ESC is powered. The yellow wire can be deleted to save room and keep things tidy.
If you have a 3ch radio, these outputs can be controlled by connecting the yellow single-wire servo plug to ch3 on your receiver. Depending on your radio handset, you may have a 2-way, 3-way or momentary switch – higher end radios will allow you to assign a switch and select how it operates. A 2-way switch will give you OFF/ON control of the lights. A 3-way switch will give you OFF/LOW/HIGH function (white LED outputs only – red outputs are OFF/ON/ON) A momentary switch will require setting up correctly on your handset to operate as either a 2-way or 3-way switch.
NOTE: Different color LEDs have different maximum input voltages and current draw, and should be wired in parallel. See the separate article on how to wire up LEDs, and tips on how to handle those tiny SMD LEDs!